

Products Description
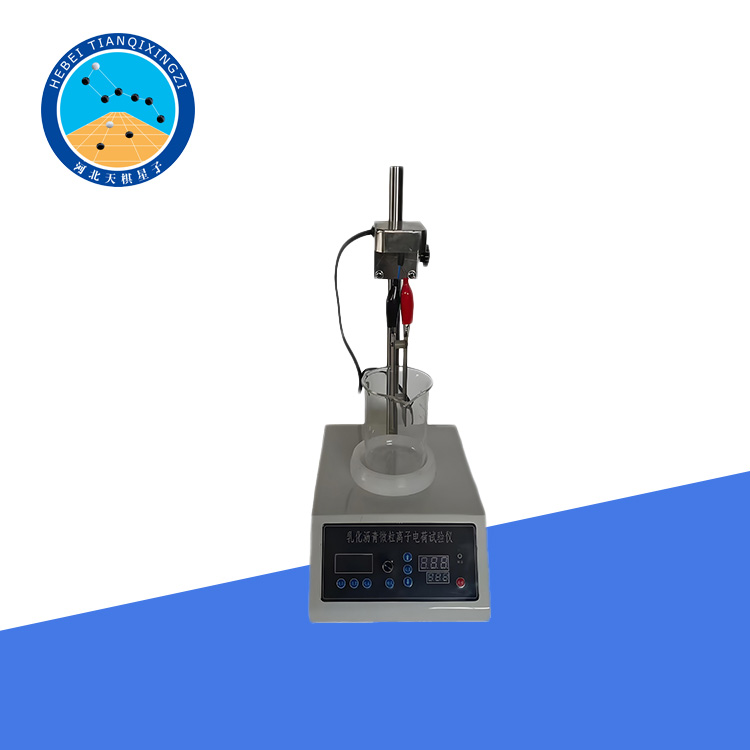
Данный прибор подходит для определения ионной полярности различных эмульгированных частиц асфальта, то есть типа ионного заряда. Прибор состоит из шнура питания, электродов, регулируемого основного блока (который может отображать напряжение, ток и время), соединительных проводов для электродов, зажимов типа «крокодил», стаканов и т. д.
Тестер ионного заряда частиц эмульгированного асфальта
Модель: LQJHT-0653
I. Введение в продукт
Прибор для измерения ионного заряда частиц эмульгированного асфальта разработан и изготовлен нашей компанией на основе метода T0653-2025 «Измерение ионного заряда частиц эмульгированного асфальта», описанного в JTG 3410-2025 «Стандартные методы испытаний асфальта и асфальтобетонных смесей для дорожного строительства». В своей конструкции и принципах испытаний он опирается на международные стандарты ASTM D244-23 «Методы испытаний и рабочие процедуры для эмульгированного асфальта» и AASHTO T59-16 «Методы испытаний для эмульгированного асфальта», что обеспечивает научную достоверность, стандартизацию и международную сопоставимость результатов испытаний.
II. Технические параметры
1) Напряжение питания: 220 В
2) Максимальный выходной ток: 150 мА
3) Точность измерения времени: 1 секунда, минимальное деление 0,1 с, максимальная погрешность ±0,10 с/ч.
4) Время измерения: регулируется от 0 до 999 секунд
5) Выходное напряжение постоянного тока: регулируемое 0-36 В, встроенный переменный резистор, обеспечивает постоянный ток не менее 50 мА.
6) Электроды: Два электрода из нержавеющей стали, каждый длиной 100 мм ± 1 мм, шириной 25 мм ± 1 мм и толщиной приблизительно 1 мм; электроды расположены параллельно с расстоянием 12 мм ± 2 мм. На электродах нанесена градуированная линия, расположенная на расстоянии 25 мм ± 1 мм от нижнего края.
7) Опора: Оснащена автоматическим зажимным устройством, регулируемой по высоте.
8) Стакан: объем 250 мл.
9) Мощность: 200 Вт
10) Температура окружающей среды: 5–40℃
11) Влажность окружающей среды: ≤85%
III. Описание системы управления
1) Регулировка тока и напряжения
Нажмите кнопку напряжения на 3 секунды. Значение напряжения на экране начнет мигать. Отрегулируйте потенциометр влево и вправо. После установки желаемого напряжения нажмите и удерживайте кнопку напряжения, чтобы завершить регулировку напряжения. Нажмите кнопку тока на 3 секунды. Значение тока на экране начнет мигать. Отрегулируйте потенциометр влево и вправо. После установки желаемого значения тока нажмите и удерживайте кнопку тока, чтобы завершить регулировку тока.
2) Способ установки времени: Нажмите кнопку «Установить», чтобы войти в меню настроек; удерживайте кнопку установки времени в течение 3 секунд, красные цифры над дисплеем времени начнут мигать, используйте кнопки вверх и вниз для установки желаемого времени; нажимайте кнопку установки еще раз, пока не начнет мигать синяя цифра внизу. Используйте кнопки вверх и вниз, чтобы установить значение в соответствии с цифрой выше, затем снова нажмите кнопку установки, чтобы завершить настройку.
3) После настройки подвесьте образец и нажмите кнопку «Старт», чтобы начать тест.
4) На задней панели основного блока находится калибровочный переключатель. Он используется для измерения напряжения и тока в положении «включено» без запуска реле времени. После завершения измерения переведите его в положение «выключено», чтобы запустить управление временем.
IV. Прочее вспомогательное оборудование
Перед проведением теста электроды следует очищать в следующем порядке: ксилол (или трихлорэтилен, или другие химически чистые растворители), 98%-ный метиловый спирт или изопропанол (или 95%-ный этанол), и, наконец, промывать дистиллированной водой.
После проведения теста электроды и стаканы следует очищать в следующем порядке: керосин, чистящий раствор, водопроводная вода, и, наконец, промывать дистиллированной водой.
V. Методы и процедуры
5.1 Методы испытаний
1) Подготовка
2) Во время проведения испытания температура в помещении должна поддерживаться на уровне 23 ℃ ± 5 ℃.
3) Очистите электродные пластины последовательно с помощью чистящего раствора, затем высушите их. Если на поверхности электродных пластин имеются точечные коррозионные следы, аккуратно отполируйте их для удаления дефектов, после чего снова очистите и высушите.
4) Подготовьте образцы в соответствии с методом T0602. Фильтрация образцов не требуется.
5.2 Процедура испытания
1) Налейте образец в стакан до подходящей высоты.
2) Закрепите два электрода изолирующими частями, чтобы сформировать электродный узел, и закрепите его на подставке зажимами типа «крокодил». Отрегулируйте высоту подставки так, чтобы электродный узел был погружен в образец в стакане, а уровень жидкости совпадал с отметками электродов.
3) Подключите выводы двух электродных пластин к источнику питания, включите выключатель питания и постепенно уменьшайте сопротивление, пока ток не достигнет 8–10 мА. Немедленно запустите таймер.
4) Когда ток упадет до 2 мА или таймер достигнет 30 минут (при выполнении любого из этих условий), выключите выключатель. Извлеките электрод из образца и осторожно промойте его водопроводной водой.
5) Внимательно осмотрите электроды. Если на отрицательном электроде отчетливо виден слой асфальта, образец является катионным. Если на положительном электроде отчетливо виден слой асфальта, образец является анионным.
6) Если отложения асфальта на электроде не очевидны или если полярность ионов не может быть определена при других обстоятельствах, повторите испытание согласно описанному выше методу. На этом этапе отрегулируйте сопротивление так, чтобы ток превысил 50 мА, и через 30 минут проверьте наличие асфальтовых отложений на электроде в соответствии с пунктом 5.2.5; если отложения асфальта на электроде не очевидны, можно определить, что они неионогенны.
7) Для медленно растрескивающегося эмульгированного асфальта, особенно для сверхстабильного медленно растрескивающегося эмульгированного асфальта, испытание также можно провести непосредственно в соответствии с требованиями пункта 5.2.6.
VI. Упаковочный лист
1) Основной блок: 1 шт.
2) Электроды: 2 шт.
3) Кронштейн: 1 комплект
4) Стакан объемом 250 мл
5) Шнур питания:
6) Инструкция по эксплуатации:
7) Сертификат соответствия